Showing posts with label engineering. Show all posts

Friday, November 22, 2019

20 Examples of Makerspace Projects in Minnetonka Classrooms


Minnetonka's Makerspace, called "The Hub" is now in its third year. Makerspaces are “are informal places or materials for creative production in art, science, and engineering where students of all ages blend digital and physical technologies to explore ideas, learn technical skills, and create new products” (source).  The Minnetonka Foundation has invested in materials and equipment at each of our six elementary schools plus our two middle schools. More about the Foundation here. Read more about the original launch here.

To encourage teachers to integrate the materials into their curriculum, professional development has been offered over the past two years, including August classes and even through a summer online course. Teachers have had opportunities to use the materials during these trainings to get more comfortable with the possible activities and gain ideas on how to use them. One page guides on how to use materials in The Hub were created. Some of our Spanish and Chinese immersion teachers even provided translations for the task and challenge cards that were created during the initial curriculum writing phase of year one. We also have a Schoology course for teachers to share ideas with one another. 

Tarah Cummings, part time Teacher on Special Assignment for The Hub, took 20 ideas our teachers shared using The Hub materials and put them together in a great Adobe Spark VideoAs you watch the video, you'll see some of the great ways that our teachers are integrating Hub tools into their curriculum in actual projects and lessons that have been taught at the elementary and middle levels in a variety of content areas. 

Each year two sites host a family event with The Hub, too. They were typically held on a Saturday and encouraged the parents to participate with their children to try out various Hub materials and activities that promote coding and making. You can read more about that here. Many of the makerspace activities and materials in The Hub also involve coding and robotics materials. You can learn more about Tonka Coders and Makers in these related posts:

Monday, July 2, 2018

The Most Magnificent Thing: Making Design Thinking Available Through Children’s Literature

A few weeks ago at the Ignite, Inspire, Innovate Conference in Stillwater I attended a session entitled Making Design Thinking Available Through Children’s Literature led by David Stricker from St. Catherine University. In this session, David highlighted the use of children's picture books to help teach design and engineering to students. 

The main book he showed was called The Most Magnificent Thing by Ashley Spires shown above. I had seen it years ago but had forgotten about it, so it was a good refresher. In the story a girl has an idea for an invention, "the most magnificent thing," and goes about building it. She works through all the steps of the design process, testing things out by trying various materials and building multiple prototypes. She spends time tinkering and observing. Her dog is an assistant in the story. She also experiences frustrations and failure, but persists and in the end is successful. 

It's a great story that really could result in some powerful conversations with students about their work and the process they go through when brainstorming and creating something. In fact, some elementary teachers in the room spoke about how they had found this book helpful with their own students. It's nice to have a main character who is female--David mentioned in his research and experience using this book, female students appreciated this and that it wasn't an issue noticed by male students. Other texts that were mentioned included What Do You Do With An Idea?Beautiful Oops!Rosie Revere the Engineer, and Iggy Peck Architect. Another attendee mentioned Accidents May Happen- 50 Inventions Discovered by Mistake by Charolette Jones. 

In addition to talking about children's literature to help teach design thinking, David pointed out is that engineering and design thinking doesn’t need robots or be expensive. We can find conceptually rich, inexpensive projects in everyday for students. For example, he described having students work on re-designing a paperclip or pop tab/can openers (working with levers, pressure, the need to keep the tab with the can). In another example, he described the task of having students redesign a cardboard lunchbox, and comparing box lunch containers from various restaurants. Each of these tasks gets students to be inquisitive and work through basic principles of engineering. You can also easily have the students work as a team collaboratively. One other resource to check out that David shared which looks good is EIE, Engineering is Elementary.

Monday, August 28, 2017

The Hub: Minnetonka Makerspaces Launch


Makerspaces are launching at Minnetonka Schools this year! Makerspaces are “are informal places or materials for creative production in art, science, and engineering where students of all ages blend digital and physical technologies to explore ideas, learn technical skills, and create new products” (source).  The Minnetonka Foundation has invested in materials and equipment at each of our six elementary schools plus our two middle schools. The Minnetonka Foundation has been raising funds for Minnetonka Schools since 1986 and has an Endowment Fund to support large, long term projects like this. (More about the Foundation) We are excited to get Makerspaces for the students in our schools.


This process actually began a year ago with initial talks and a lot of planning and research. Staff at each site started meeting and brainstorming to decide how and where to begin. Staff who participated in this process included students, parents, teachers, principals, media specialists, design for learning representatives, Tonka Codes building leaders, high potential teachers, middle school STEM teachers, instructional technology coaches and district administrators.


The initial site conversations narrowed down the scope, including the arranging the makerspace by themes: structural, electrical, digital media, robotics/coding, artistic. Each site’s makerspaces will primarily be mobile, with a wheeled storage cart (pictured) or a larger wheeled cabinet for each theme that teachers can check out from the media center for use in their classroom. Since most of our sites are tight on space, this mobile solution was the preferred choice. It will also encourage teachers to embed makerspace activities into their curriculum and have students demonstrate their knowledge in all curricular areas instead of view it as an add on or place students would have to go to experience.


In the spring and over this past summer, staff began researching products available and deciding what to purchase. Teachers also began planning lessons and units for their students using the makerspace materials so these curricular materials would be ready to go for colleagues to get started instead of having to start from scratch. Over the past week before teacher workshops, teachers have been attending makerspace classes to learn more. The Minnetonka Foundation set up all the materials in a showcase room for teachers to explore who have been attending summer trainings.


Minnetonka Makerspaces have been branded as "The Hub" and the carts have been wrapped with this logo as pictured. As part of their duties, two teachers will also work to support the makerspaces, guide the development of the program, provide teachers with professional development, research, and find innovative resources to enhance the program. Expanded Maker Faires are being planned for the coming year as well as other activities that will get our students tinkering, creating, designing, and more. It will be an exciting year!

Monday, April 18, 2016

3D Printing in Minnetonka Schools

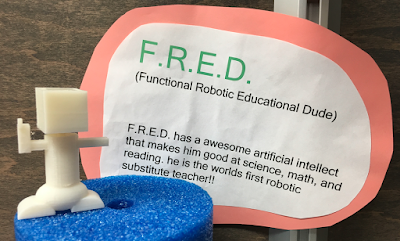
Fourth grade student created substitute teacher robot of the future.
During our Annual District Tours last month, visitors had the opportunity to see student created designs printed on 3D printers at both Groveland Elementary School and Minnetonka High School. We have 3D printers at other sites as well; they are used in our eighth grade advanced robotics courses and at Clear Springs Elementary School. 3D printing manufacturers were a major presence at this year's CES Conference which I attended where there was everything from printed food to a printed motorcycle on display. There will undoubtedly be more 3D printers in schools in the future.

After learning about 3D printers at the annual Minnesota TIES Technology Conference in December 2014, principal Dave Parker met with Media Specialist Colleen Small and put together a plan to begin researching and secure funding for a 3D printer at their school. Colleen wanted an enclosed printer that would keep fingers out during the printing process, so she began a trial period with a Stratys Mojo printer. The vendor was very supportive in helping to get things going. Colleen began learning how to use it and get students involved, too. The Groveland PTA ended up purchasing the printer.
Groveland Elementary's Stratys 3D printer
When 3D printers first came into schools years ago their use was pretty limited. Until easy to use and free software became more available, a lot of the uses I saw for 3D printing by students and teachers seemed to basically be to print off pre-designed objects. Although these items are still available on sites like Thingiverse, Colleen wanted the students to make their own. To do this, she had fourth grade students set up accounts and use TinkerCad. They began to create and design models of robots that could help with something around the school. In TinkerCad, students saved their designs as .stl files which were printed from their Stratys 3D printer. 

Colleen explained that although each kid had an account, not all designs were printable. She says it was a great spatial learning task and experience for the students, as many didn't realize their drawings and objects were not on the same work plane. Some students robots might have looked OK from the front, but when viewed from all angles the models had disconnected parts. Students who created models that were all connected were able to print their designs and take them home. Some students' projects are pictured.

Hand printed from Project Enable design.
In addition to fourth grade students, third grade students in Tatiana Giraldo's class at Groveland Elementary also recently used the 3D printer. When they were learning about the skeletal system in science, Tatiana introduced the students to Project Enable, an organization that is "A Global Network Of Passionate Volunteers Using 3D Printing To Give The World A "Helping Hand." The organization's members use 3D printers to create "free hands and arms for those in need of an upper limb assistive device." Tatiana and her students ordered the kit of parts and then printed off the hand pictured. Students were able to manipulate this hand and observe how the fingers work as they learned about exo and endoskeletons. They will be donating the hand to the organization later this spring. Colleen is hoping that students next year in fifth grade can use the AutoDesk app on their iPads to build models and designs for their water rockets science unit. Besides science and health, there are so many possibilities with other subject integration such as math and language arts. She hopes to have younger students design models of a storybook character they are writing about. High Potential (gifted) students at Groveland used the 3D printer this year to create architectural designs.
Senior student designed phone case.
At the upper grades, students at Minnetonka High School in Mitch Burfeind's classes use AutoDesk Inventor to apply the engineering design process. When guests at our Annual Tours were in these classes last month, they saw students working on designing objects that they could use in their life. Students could then print their design on a MakerBot printer. One senior student showed me his phone case design (pictured) and the finished printed product. He explained that it was very difficult to get the case to actually fit on the phone and stay on, so he had gone through multiple iterations on his project. 

It is fun to see 3D printers in use from our youngest to oldest students. I'm anxious to see more of what they create in the future. Perhaps soon they will start to include integrated and printed circuits like I saw at CES. Perhaps they'll be printing food for our cafeteria, too!